Table of Contents:
- Why are there multiple instances of the Printer installed?
- What size is a Kiosk Badge?
- What device operating systems work with the Kiosk software?
- What device operating systems work with the Kiosk Companion?
- Kiosk applications and options
- How many kiosks will I need for my event?
- How do I order my Kiosk Hardware?
- What is the difference between all the Kiosk screen check in options?
- How can attendees access their unique QR code?
- What do attendees need to know for Kiosk check in?
- How can attendees check in to a Kiosk?
- Kiosk Hardware Specifications
Kiosk Manager FAQs for Organisers:
- How many kiosks will I need for my event?
- What size is a Kiosk Badge?
- What is the difference between all the Kiosk screen check in options/scan methods?
- How can attendees access their unique QR code?
- How do I configure my kiosk for my scan method?
- How do I edit the screen options on my kiosk?
- QR codes are not scanning correctly. How do I fix this?
Kiosk Companion FAQs for Onsite Staff:
- What device operating systems work with the Kiosk Companion?
- How do you select what Printer to Print from?
- Kiosk Companion and Custom Profile Fields
- Kiosk Companion Badge Preview
FAQ: Why are there multiple instances of the Printer installed?
A: For Windows the same device plugged into different USB ports on the computer represents a new device. The device is installed again and again once for each and every USB port the device is plugged in.
You need to have one installation of the printer and the printer name MUST be; EPSON TM-C3500
Possibly fixes
Disconnect printer (remove from USB port), and delete all copies of the printer. Then reconnect the printer. This should install a new copy of the printer correctly named.
FAQ: What size is a Kiosk Badge?
A: Whilst Kiosk Manager can support badges of all sizes, the size of a Kiosk Badge will depend on your Kiosk Hardware provider.
Most commonly used Kiosk Badge Paper Stock is 100mm x 152mm (3.93 inch x 5.98 inch).
FAQ: What device operating systems work with the Kiosk software?
A: The Kiosk software is supported on devices running at least Windows 10.
FAQ: What device operating systems work with the Kiosk Companion?
A: The Kiosk Companion a web-app and will run on any modern web browser on any device.
FAQ: What are some kiosk applications and options?
A: Once your Kiosk software has been installed you can run the Kiosk Launcher. The Launcher houses kiosk hardware options and applications.
Kiosk Launch Home Screen
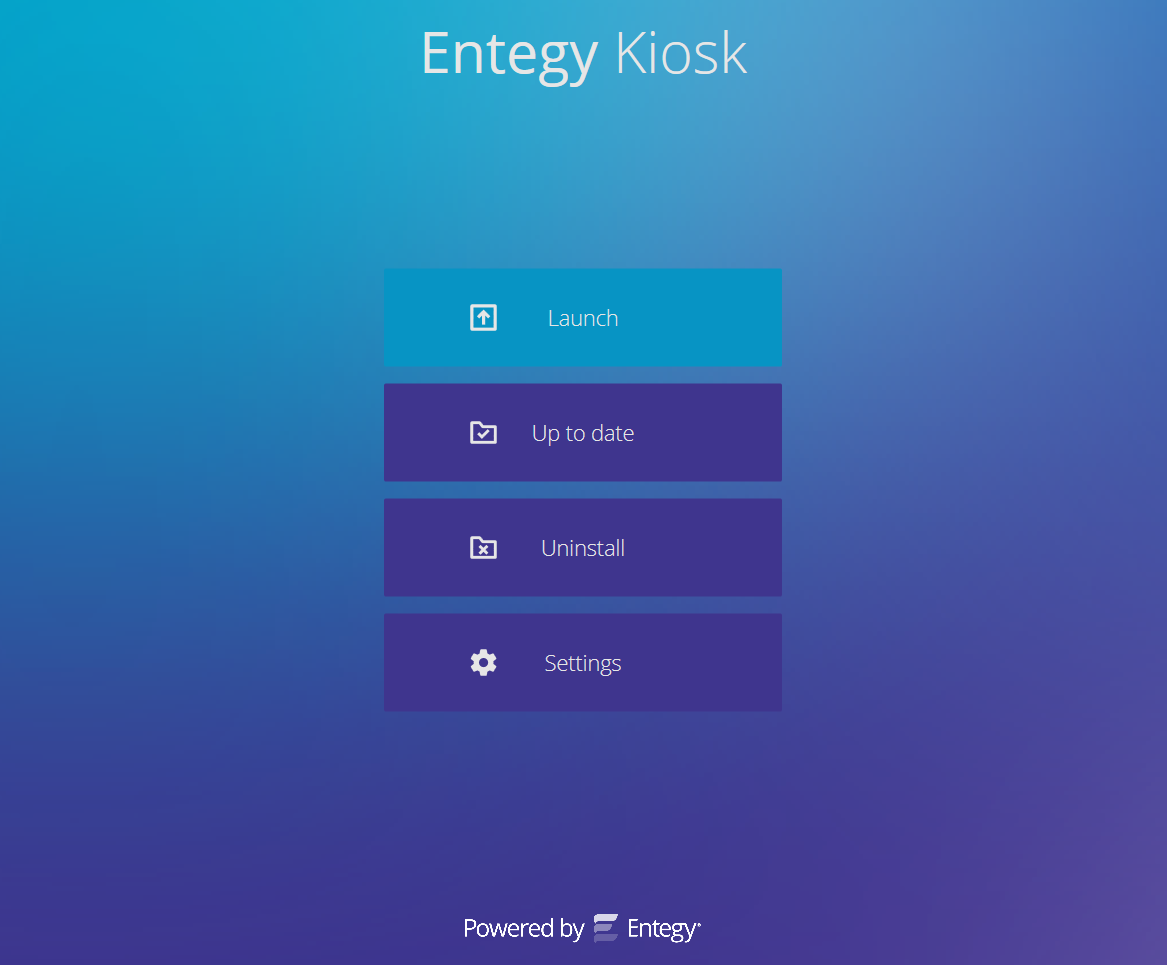
Launch - If your Kiosk is configured in the Core you can launch your Kiosk to login
Up to date - any required updates will be shown here
Uninstall - uninstall the Kiosk
Settings - view various settings, see below.
Settings Menu
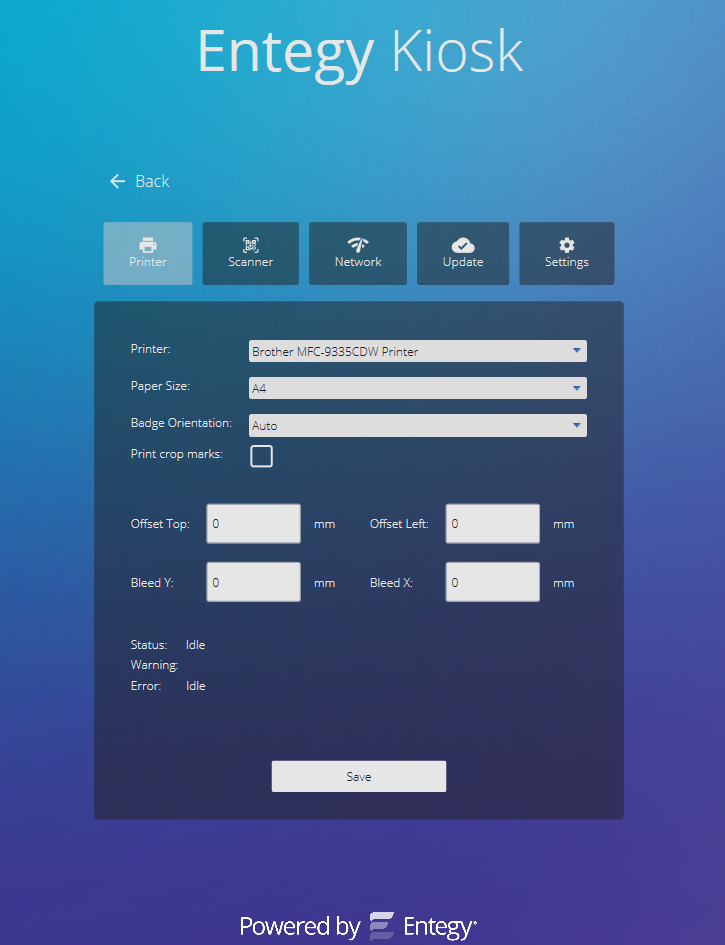
Printer: Printer selection, and Media size
Scanner: Show details of connected scanner
Network: Test network speed/connection
Update: Check for any Kiosk software updates
Settings: Reset kiosk defaults, Uninstall Kiosk software, and knowledgebase link
FAQ: How many kiosks will I need for my event?
A: There are a number of things to consider before confirming the number of kiosk you will need for your event.
Some things to consider are:
- Number of attendees expected
- How many expected attendees have pre-registered
- How attendees will check in
- The period of time you expect the majority of attendees to arrive
Most event organisers will use a formula based on the number of expected attendees versus an acceptable throughput rate to determine the number of kiosks required.
FAQ: How do I order my Kiosk Hardware?
A: We have a number of Entegy Partners who provide kiosk hardware and on-site support. Browse our directory by 'type' to find our hardware providers.
Hardware partners hire or sell devices, screens, kiosks, or scanners to complement the Entegy Suite.
If you are looking at investing in your own hardware there is a list of Kiosk Hardware Specifications compatible with Kiosk Manager software.
FAQ: What is the difference between all the Kiosk screen check-in options?
A: There are several check-in options available on the Kiosk display screens.
Enter Code: an attendee inputs a unique reference code
Scan QR: an attendee provides their unique QR code to scan
Register: links to a registration form from the Registration Element
Insert your printed/e-ticket: an attendee provides their unique QR code to scan
Scan this code via event app: an attendee uses the QR Scanner on the event App. It also requires an attendee to be logged into the event App
If an option is not relevant to your attendees (or event) you can remove them from the Kiosk display screen by editing the screen options in the Core.
FAQ: How can attendees access their unique QR code?
A: A unique QR code enables attendees to scan into a registration kiosk to print their badge
Attendees can be set up to access their unique QR Code via:
- In-app Badge: a simplified badge can be setup in the event App to display attendee unique QR codes.
- Emailed ticket or confirmation email: unique QR codes can be emailed to attendees upon registration or as part of their ticket.
FAQ: What do attendees need to know for Kiosk check-in?
A: Depending on how Kiosk check-in is set up for your event you may need to communicate some simple instructions to your attendees:
- If attendees are scanning their unique QR Code they need to have been issued with a code.
- If attendees are entering a unique reference code they will need to be made aware of what this code is.
- If attendees are to register on-site at a Kiosk you may wish to advise them to come early to minimise Kiosk queue times.
- If attendees are scanning the event QR code displayed on the Kiosk user display screen they will need to be made aware of:
- how to login to their profile on the event App
- how to access and use the QR Scanner on the event App
FAQ: How can attendees check in to a Kiosk?
A: There are four check-in options available on the Kiosk. The suitability of each option for your event will be dependant on what information you intend to provide your attendees prior to the event.
You may choose to allow all four check-in options on your kiosk or limit the options to just a few for your event.
To check in on a Kiosk attendees can:
- Scan a unique QR Code on their registration ticket/confirmation email
- Each attendee is assigned a unique QR Code that is associated with their profile in the Core.
- Enter a unique reference code
- Each attendee is set up as a Profile in the Core with a unique access code. You can also manage profile settings to import your own unique reference code for each Profile
- Complete a registration form
- Kiosks integrate with the Entegy suite Registration element, enabling a registration form to be set up onto a Kiosk
- Scan the event QR code using the QR Scanner from the event App
- The QR Scanner feature of the event App allows attendees to scan the event QR Code displayed on the Kiosk user display screen
FAQ: Kiosk Hardware Specifications
A: If you are looking at investing in your own hardware, below is a list of Kiosk Hardware Specifications compatible with Kiosk Manager software version 2 or higher. It is recommended that you update to the latest version of Kiosk Manager before using it on-site to ensure you have the latest capabilities and support.
PC
Windows Surface Pro is recommended
The gigabyte GB-BXi3 is also an option
Operating System
Windows 10 is required (iOS is not supported)
Monitor
All monitors need to be touchscreen
1920 x 1080 (16:9) is recommended [portrait is supported]
Higher resolutions will have scaling problems
Other options -
1280 x 1024 px
1368 x 912 px -> This is the Surface Pro 3 which is ½ resolution because of the pixel density.
Printer
Kiosk now supports most types of printers, although printer-related error handling will be limited by each individual manufacturer and what they expose to Windows.
The Kiosk is currently set up for the use of the following manufacturers' APIs to handle printer errors:
- Epson TM C3500
- Bixolon SPLTX 420
- Dymo Labelwriter 450
The Kiosk only uses these models for error handling e.g. Out of Paper, Out of Ink.
Other printer manufacture may only show very basic onscreen messages - such as please check printer.
Scanner
Gryphon-GFS4470 [Recommended - may be branded to as Datalogic in some Countries]
Scanners need to support USB-COM port communication. Generally, this is done by setting the mode of the scanner to virtual COM port, meaning the Scanner is connected to the PC via USB port, but it's treated as if it's connected via a COM port. The user guide or your hardware supplier will be able to confirm this for you (manufacturers often use different terminology for this).
Network connection
Wifi is recommended, although a mobile broadband network connection can also be used by the Kiosk.
FAQ: How many kiosks will I need for my event?
A: There are a number of things to consider before confirming the number of kiosks you will need for your event.
Some things to consider are:
- Number of attendees expected
- How many expected attendees have pre-registered
- How attendees will check-in
- The period of time you expect the majority of attendees to arrive
FAQ: What size is a Kiosk Badge?
A: Whilst Kiosk Manager can support badges of all sizes, the size of a Kiosk Badge will depend on your Kiosk Hardware provider.
Most commonly used Kiosk Badge Paper Stock is 100mm x 152mm (3.93 inch x 5.98 inch).
FAQ: What is the difference between all the Kiosk screen check-in options/scan methods?
A: There are several check-in options available on the Kiosk display screens.
- Enter Code: an attendee inputs a unique reference code
- Scan QR: an attendee provides their unique QR code to scan
- Register: links to a registration form from the Registration Element
- Insert your printed/e-ticket: an attendee provides their unique QR code to scan
- Scan this code via event app: an attendee uses the QR Scanner on the event App. It also requires an attendee to be logged into the event App
If any option is not relevant to your attendees (or event) you can remove them from the Kiosk display screen by editing the screen options in the Core.
FAQ: How can attendees access their unique QR code?
A: A unique QR code enables attendees to scan into a registration kiosk to print their badge.
Attendees can be set up to access their unique QR Code via:
- In-app Badge: a simplified badge can be set up in the event App to display attendee unique QR codes.
- Emailed ticket or confirmation email: unique QR codes can be emailed to attendees upon registration or as part of their ticket.
FAQ: How do I configure my kiosk for my scan method?
A:
Confirm Kiosk Options: QR Code Scan
- Navigate to Badges > Kiosk Manager from the Navigation Menu and select the relevant Kiosk from the list
- Confirm the following settings:
- Allow Scanning: YES
- Allow Scanning from App: YES
- Click Save
Confirm Kiosk Options: Enter Code
- Navigate to Badges > Kiosk Manager from the Navigation Menu and select the relevant Kiosk from the list
- Confirm the following settings:
- Allow Enter Code: YES
- Click Save
Confirm Kiosk Options: Registration
Create a registration form (no payment)
- Navigate to Registration > Form Setup from the Navigation Menu
- Next to Sign-up Form click on the drop-down
- Select Form Builder
- Edit as required
Link registration form to Kiosk
- Navigate to Registration > Form Setup from the Navigation Menu
- Copy registration form link from appropriate form
- Navigate to Badges > Kiosk Manager from the Navigation Menu
- Click on the drop-down for the appropriate Kiosk
- Select Edit Kiosk
- Navigate to Registration Form Address
- Insert registration form link
- Click Save
FAQ: How do I edit the screen options on my kiosk?
A: There are several check-in and scan options available on the Kiosk screen. Depending on what information you intend to provide your attendees determines how your attendees can check-in. Therefore you may wish to edit the options available on the screen.
Hide Enter Code Button
The Enter Code button requires an attendee to input a unique reference code
- Navigate to Badges > Kiosk Manager from the Navigation Menu
- Click on the drop-down for the appropriate Kiosk
- Select Edit Kiosk
- Navigate to Allow Enter Code
- Select No
- Scroll down to Save
Hide Scan QR Button
The Scan QR button requires an attendee to scan a unique QR code. Hiding this button will also hide the Insert your printed / e-ticket option
- Navigate to Badges > Kiosk Manager from the Navigation Menu
- Click on the drop-down for the appropriate Kiosk
- Select Edit Kiosk
- Navigate to Allow Scanning
- Select No
- Scroll down to Save
Include Register Button
The Register button links to a registration form from the Registration Element. This button will only show if a registration form has been attached
- Navigate to Badges > Kiosk Manager from the Navigation Menu
- Click on the drop-down for the appropriate Kiosk
- Select Edit Kiosk
- Navigate to Registration Form Address
- Input your registration form URL, from the Registration Element
- Scroll down to Save
Hide Insert your printed/ e-ticket option
The Insert your printed/ e-ticket option requires an attendee to scan a unique QR code. This will also hide the Scan QR Button
- Navigate to Badges > Kiosk Manager from the Navigation Menu
- Click on the drop-down for the appropriate Kiosk
- Select Edit Kiosk
- Navigate to Allow Scanning
- Select No
- Scroll down to Save
Hide Scan this code via the event app option
The Scan this code via event app option requires an attendee to be logged into the event App and able to access the QR Scanner on the event App.
- Navigate to Badges > Kiosk Manager from the Navigation Menu
- Click on the drop-down for the appropriate Kiosk
- Select Edit Kiosk
- Navigate to Allow Scanning from App
- Select No
- Scroll down to Save
FAQ: QR codes are not scanning correctly. How do I fix this?
A: If you are using a QR code from an external registration system (e.g Eventbrite), you will need to set the Badge Regex Expression to match your QR Code data.
To configure your external code in the Core:
- Navigate to Badges > Settings > Advanced from the Navigation Menu
- Select the appropriate Regex Expression
FAQ: What device operating systems work with the Kiosk Companion?
A: The Kiosk Companion is a browser-based site and will run on any modern web browser on any device. The URL is: https://kiosk.entegy.com.au/
FAQ: How do you select what Printer to Print from?
A: Once you have searched for an attendee on the Kiosk Companion App and selected Print Badge you will be able to select from the available Kiosks.
FAQ: Kiosk Companion and Custom Profile Fields
A: Kiosk Companion does not display custom profile fields. If a Custom Profile Field needs to be updated this will need to be actioned in the Core or Core Integrated Registration platform.
FAQ: Kiosk Companion Badge Preview
A: Badge Preview will display the default badge. When printing a Badge the Kiosk will print the badge template associated with that Kiosk. Badge Preview only displays standard profile fields, not custom profile fields.